Making Data Exports Easier with SheetJS and React JS

Esther is a self-taught front-end developer passionate about making the web seamless, accessible and with great user experience. She believe the web shouldn't be a place where you get tired of searching for information. She's a Community builder. When she's not coding, you can find her trying new food recipes, listening to music, visiting fun places and exploring new things to learn.
If you work with data, you know that exporting it from one platform to another can be a challenge. However, with the help of SheetJS and React JS, this process is made easier. SheetJS is an open-source JavaScript library for manipulating spreadsheets in the browser (part of the suite of libraries called the "JS-XLSX" library) while React JS is a JavaScript library used to build user interfaces. Let's take a look at how these two powerful tools can be used together to export data.
Prerequisites:
You should have basic knowledge of React Js, creating a React App, and running a react app.
How SheetJS Works
SheetJS allows developers to convert table data between different spreadsheet formats such as XLSX (Excel 2007+ XML), XLSB (Excel 2007+ Binary), XLS (Excel 97-2004 Binary), ODS (OpenOffice), Flat ODS (OpenOffice), SpreadsheetML (Excel 2003). It supports both client-side and server-side operations, so you can use it on both frontend and backend applications. To get started with SheetJS, you either download the file from GitHub or npm. Once you have installed the file, you will be able to access all of its utility functions and features.
One of these features is parsing data from any given source into a format compatible with other applications or libraries - such as React JS. This makes it easy to move data from one platform to another without having to manually input everything each time. Furthermore, SheetJS also allows developers to write their own custom functions which greatly increases its versatility and usefulness when dealing with complex data sets.
Using React JS with SheetJS
Now that we understand what Sheetjs offers us let's take a look at how we can utilize React JS along with our data export task. The first step is setting up our project folder structure using create-react-app so that we have all our necessary files in place for development purposes.
npx create-react-app list—items
//create react app called list-Items

cd list-items
//enter into the directory of the app you created -> list-Item

npm start
//run react app
Create a table using React JS
Create a basic table to display the list of items and their prices. Include the code below in your App.js and App.css file
/* App.js */
<div className="App">
      <div>
      </div>
      <table>
        <thead >
          <tr>
            <th>#</th>
            <th>Item Name</th>
            <th>Amount</th>
          </tr>
        </thead>
        <tbody>
           <td>Items</td>
        </tbody>
      </table>
      <button>Export</button>
    </div>
App {
  width: 100%;
  height: 100vh;
  margin: 0 auto;
}

table {
  width: 800px;
  height: 200px;
  border-collapse: collapse;
  margin-bottom: 12px;
}

th {
  border-bottom: 1px solid rgb(82, 82, 82);
  border: 2px solid rgb(82, 82, 82);
}

td {
  text-align: center;
  border: 2px solid rgb(82, 82, 82);
}

button{
  background-color: rgb(95, 171, 238);
  padding: 8px 12px;
  border: none;
}
Setting up the Library
After that has been completed, we will then install sheet js by running the command ‘npm install xlsx’ in our terminal window which will add sheet js as a dependency in our package json file allowing you to import it into your App js or wherever necessary via import { utils, writeFile } from 'xlsx'; Now we are ready to start writing code!
import { utils, writeFile } from 'xlsx'
Create a file called data.js , add the code below to the file. The data contains the items that will be displayed on the table as an array of objects.
export const data = [
    { name: 'Smart TV', amount: 250000 },
    { name: 'Rechargeable fan', amount: 50000 },
    { name: 'Table', amount: 80000 },
    { name: 'BedFrame', amount: 120000 },
]
import './App.css';
import { data } from './data'
import { utils, writeFile } from 'xlsx'

function App() {
  return (
    <div className="App">
      <div>
      </div>
      <table>
        <thead >
          <tr>
            <th>#</th>
            <th>Item Name</th>
            <th>Amount</th>
          </tr>
        </thead>
        <tbody>
          {
            data.map((item, index) => {
              return (
                <tr key={`${item}${index}`}>
                  <td>{index + 1}</td>
                  <td>{item.name}</td>
                  <td>N{item.amount}</td>
                </tr>
              )
            })
          }
        </tbody>
      </table>
      <button>Export</button>
    </div>
  );
}

export default App;
Now that we have our library installed and imported correctly, let’s move on to actually exporting data into an Excel file!
Exporting Data with Sheet JS
To export data with sheet js, we need an array of objects representing each row of data we want to be exported, specify the name of the file, the data to be written, the options such as the type of the file, and write the data to a file in excel format.
The array of objects should look something like the one in our data.js file. For each key-value pair in the object, a new column will be created in our spreadsheet containing the corresponding value for each row. Once we have our array of objects ready, we can pass it off into our workbook object via its write method like so writeFile(wb, "items.xlsx") . This will write all of our data into a new spreadsheet and finally, the data will be saved on your computer/device using the file name items.xlsx. All this can be done with the exportData function below
//export function
const exportData = () => {
//creates an empty workbook with no worksheet
    let wb = utils.book_new(), //creates a new workbook

            //coverts JSON data into a sheet
      ws = utils.json_to_sheet(data);

    utils.book_append_sheet(wb, ws, "items")
// package and release data (`writeFile` tries to write and save an XLSX file)
    writeFile(wb, "items.xlsx")
  }
There are different sheet js utility functions but in the course of this article, we will be focusing on the ones listed below.
book_new
json_to_sheet
book_append_sheet
writeFile
book_new : This utility function creates a new, empty workbook that does not contain any worksheets
json_to_sheet : This utility function is designed to take an array of JavaScript objects as input and convert them into a worksheet object, preserving the order of the objects in the array.
book_append_sheet : This utility function can be used to add a worksheet to an existing workbook. It takes a worksheet object as an argument, as well as a desired name for the worksheet. The function can be called multiple times to add multiple worksheets to the same workbook. However, if a worksheet with the specified name already exists in the workbook, the function will raise an error
writeFile : This determines the format in which your data will be saved. The method packages the data and attempts to save the new file.
And finally, add an onClick event to the Export button that will call the exportData function when the button is clicked to download the file.
<button onClick={exportData}>Export</button>
Your final code should look like this.
import { data } from './data'
import './App.css';
import { utils, writeFile } from 'xlsx'


function App() {

  const exportData = () => {
    let wb = utils.book_new(),
      ws = utils.json_to_sheet(data);
    utils.book_append_sheet(wb, ws, "items")
    writeFile(wb, "items.xlsx")
  }

  return (
    <div className="App">
      <div>

      </div>
      <table>
        <thead >
          <tr>
            <th>#</th>
            <th>Item Name</th>
            <th>Amount</th>
          </tr>
        </thead>
        <tbody>
          {
            data.map((item, index) => {
              return (
                <tr key={`${item}${index}`}>
                  <td>{index + 1}</td>
                  <td>{item.name}</td>
                  <td>N{item.amount}</td>
                </tr>

              )
            })
          }
        </tbody>
      </table>
      <button onClick={exportData}>Export</button>
    </div>
  );
}

export default App;
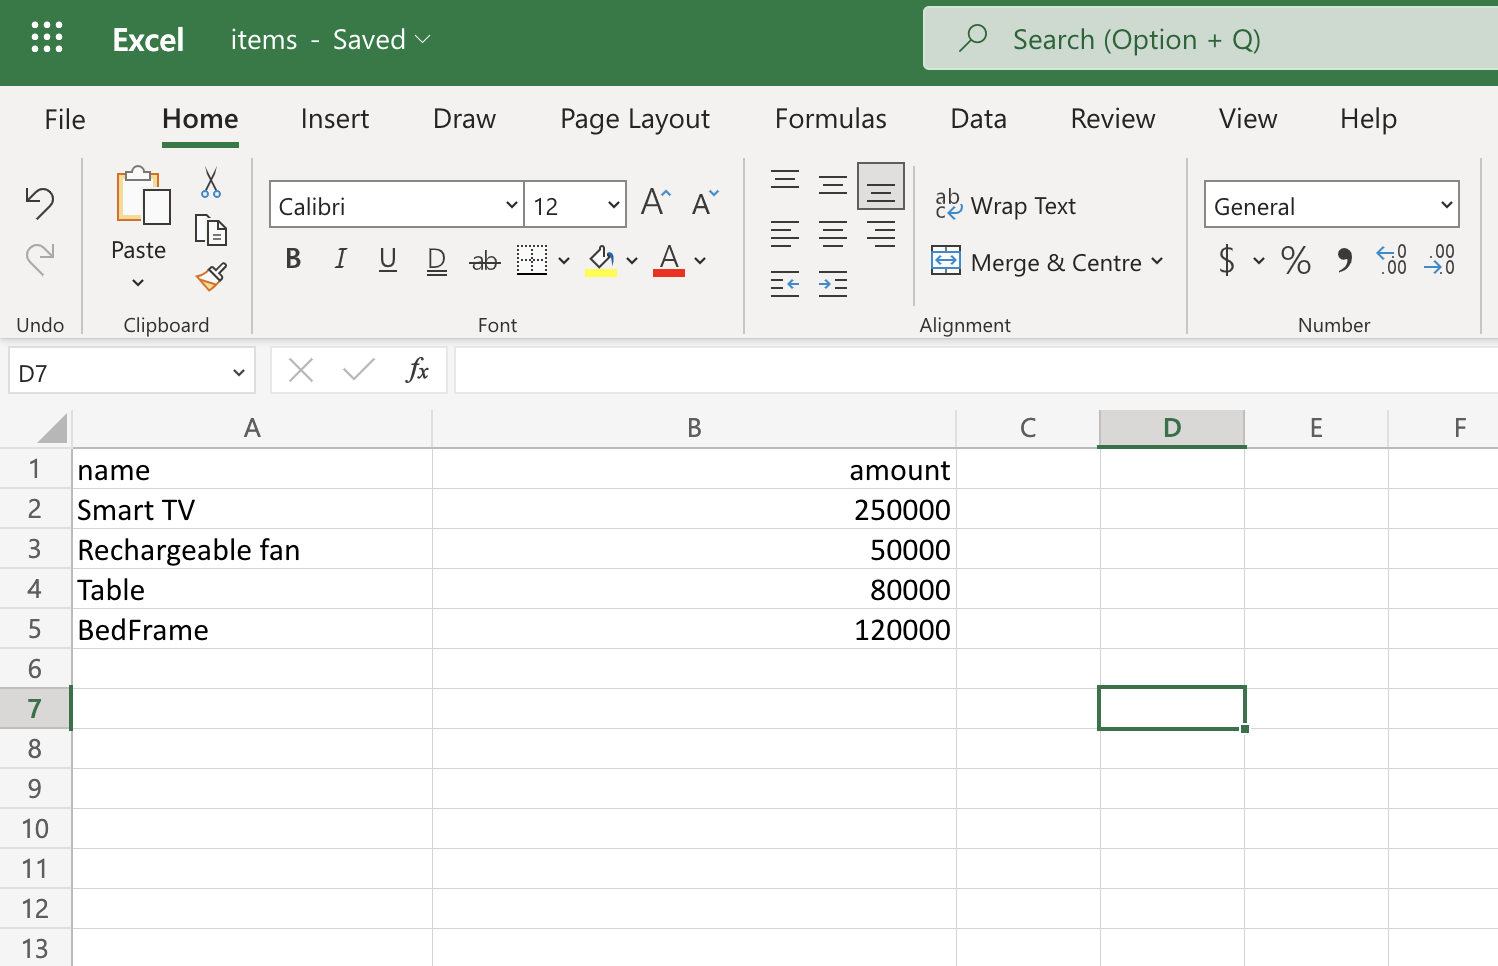
You can now click on the button to export the data. Your excel sheet will look similar to the one below.
Conclusion
Using SheetJs and React JS together makes it easier to export large amounts of structured data quickly and easily across multiple platforms without losing accuracy or quality in the transfer process due to their interoperability functionality. These two powerful tools enable developers to manipulate spreadsheets in the browser quickly while still maintaining high levels of accuracy. This combination ultimately allows for more efficient development processes when dealing with complex datasets making them invaluable assets when working on projects involving large amounts of data exports. So if your project involves moving large quantities of structured information from one platform to another consider using SheetsJs alongside React Js or any other JavaScript library(Vue Js, Angular, Svelte) – It could save you both time and energy! Thanks for reading.


